Panel을 UI로 만든후 시점이 맞았을때
패널을 보이게 하고 그렇지 않을 경우 보이지 않게 한다.
using System.Collections;
using System.Collections.Generic;
using UnityEditor;
using UnityEngine;
using UnityEngine.EventSystems;
using UnityEngine.InputSystem.LowLevel;
public class Car : MonoBehaviour, IPointerEnterHandler, IPointerExitHandler, IGvrPointerHoverHandler
{
private Coroutine coroutine;
public GameObject menuUI;
public void OnGvrPointerHover(PointerEventData eventData)
{
//Debug.Log("Hover");
}
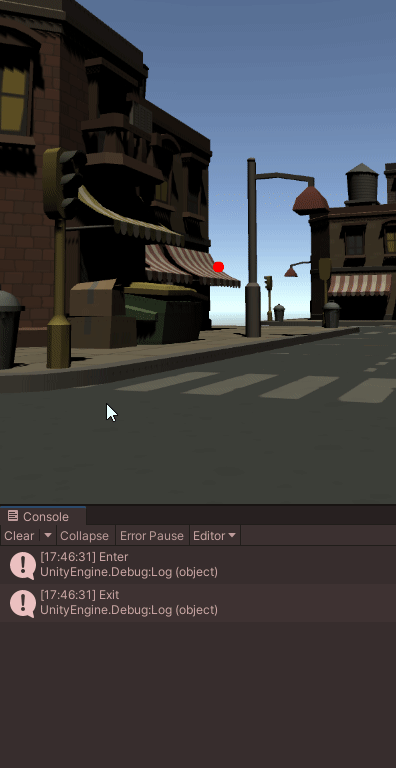
public void OnPointerEnter(PointerEventData eventData)
{
coroutine = StartCoroutine(CoClick());
Debug.Log("Enter");
menuUI.SetActive(true);
}
private IEnumerator CoClick()
{
float delta = 0f;
while (true)
{
delta += Time.deltaTime;
if(delta >= 3)
{
Debug.LogFormat("Clicked , {0}", delta);
delta = 0f;
}
yield return null;
}
}
public void OnPointerExit(PointerEventData eventData)
{
Debug.Log("Exit");
menuUI.SetActive(false);
StopCoroutine(coroutine);
}
}

플레이어의 위치에 따라서 패널의 방향이 변경되는데
이는 캔버스안에 넣어주어야 한다.
using System.Collections;
using System.Collections.Generic;
using UnityEngine;

public class Billboard : MonoBehaviour
{


    // Update is called once per frame
    void Update()
    {
        this.transform.LookAt(Camera.main.transform.position);
    }
}


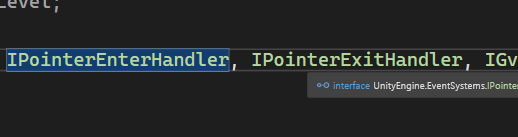
IPointerEnterHandler, IPointerExitHandler는 유니티엔진에 있는 메소드이지만,
IGvrPointerHoverHandler는 직접 만들어준 메소드이다.


커스텀 래티클 만들기
이번엔 기존에 사용했던 빨간색 래티클을 없애고 새로운 래티클을 만들어 주려 한다.
Main Camera의 GvrRecticlePointer와 GvrPointerPhysicsRaycast를 비활성화 한다.
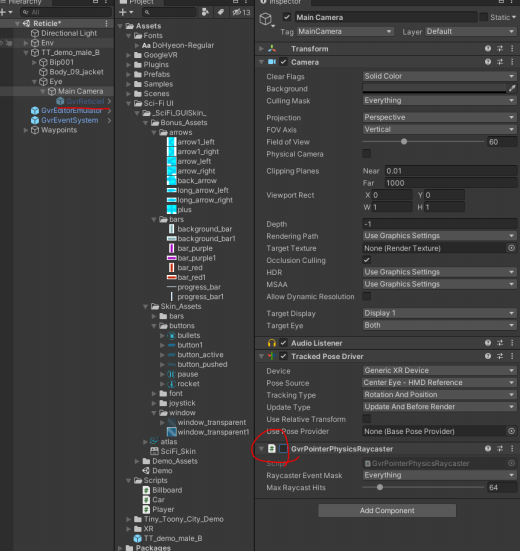
Main Camera자식으로 Canvas를 생성하고 다음과 같이 속성을 변경 한다

그리고 적절한 이미지를 붙여준 후 Fill효과를 넣어줄 것이므로
복사해서 앞과 뒤를 만든다.
Back은 알파 값을 조금 줄여주고
Front는 filled, Radial 360, Top으로 변경하였다.
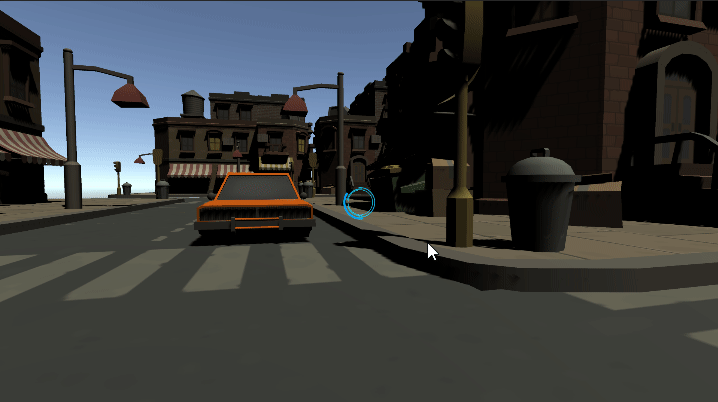
우선 래티클이 변경되었으니 인지를 하게 만드는 것이 우선인데
차의 레이어는 7 메뉴의 레이어는 6으로 만들어서
인지할수 있도록 하였다.
using System.Collections;
using System.Collections.Generic;
using UnityEditor;
using UnityEngine;
using UnityEngine.EventSystems;
using UnityEngine.InputSystem.LowLevel;

public class Car : MonoBehaviour, IPointerEnterHandler, IPointerExitHandler, IGvrPointerHoverHandler
{
    private static Car instance;
    private Coroutine coroutine;
    public GameObject menuUI;

    private void Start()
    {
        //menuUI.SetActive(false);
    }

    private void Awake()
    {
        if (instance == null)
        {
            instance = this;
        }
        else
        {
            Debug.LogWarning("Duplicate instance of Car found!");
            Destroy(gameObject); // 중복된 인스턴스 제거
        }
    }

    public static Car GetInstance()
    {
        return instance;
    }


    public void OnGvrPointerHover(PointerEventData eventData)
    {
        //Debug.Log("Hover");
    }


    public void OnPointerEnter(PointerEventData eventData)
    {
        coroutine = StartCoroutine(CoClick());
        Debug.Log("Enter");
        menuUI.SetActive(true);
        Debug.Log("이벤트 대상: " + eventData.pointerEnter.name);
    }


    private IEnumerator CoClick()
    {
        float delta = 0f;
        while (true)
        {
            delta += Time.deltaTime;
            if(delta >= 3)
            {
                Debug.LogFormat("Clicked , {0}", delta);
                delta = 0f;
            }
            yield return null;
        }
    }
    public void OnPointerExit(PointerEventData eventData)
    {
        Debug.Log("Exit");
        menuUI.SetActive(false);
        StopCoroutine(coroutine);
    }
}
using System.Collections;
using System.Collections.Generic;
using UnityEngine;
using UnityEngine.EventSystems;
using UnityEngine.UI;
public class EyeCast : MonoBehaviour
{
private Transform trans;
private Ray ray;
private RaycastHit hit;
public float dist = 10f;
public Image gauge;
bool isOpenedUIMenu = false;
private Car carInstance; // 전역 변수로 선언
void Start()
{
this.trans = this.GetComponent<Transform>();
carInstance = Car.GetInstance(); // 전역 변수에 할당
carInstance.menuUI.SetActive(false);
}
void Update()
{
ray = new Ray(this.trans.position, this.trans.forward);
Debug.DrawRay(ray.origin, ray.direction * this.dist, Color.green);
var mask = 1 << 6 | 1 << 7; // 레이어 마스크 설정
if (Physics.Raycast(ray, out hit, dist, mask))
{
this.GazeButton();
}
else
{
ReleaseButton();
// 여기에서 메뉴 닫는 동작을 추가할 수 있습니다.
// 예: carInstance.menuUI.SetActive(false);
}
}
private void GazeButton()
{
if (this.hit.collider.gameObject.layer == 7 && carInstance != null)
{
carInstance.menuUI.SetActive(true);
}
}
private void ReleaseButton()
{
if (this.hit.collider == null || this.hit.collider.gameObject == null)
{
carInstance.menuUI.SetActive(false);
}
}
}
보기와 같이 코드에서 차뿐만이 아닌 버튼에도 레이어를 설정해두었기 때문에
버튼쪽에 래티클을 갖다 두어도 창이 사라지지 않는다.
레이어를 인식해서 게이지를 채우고
나갔을 때 초기화
using System.Collections;
using System.Collections.Generic;
using UnityEngine;
using UnityEngine.EventSystems;
using UnityEngine.UI;

public class EyeCast : MonoBehaviour
{
    private Transform trans;
    private Ray ray;
    private RaycastHit hit;
    public float dist = 10f;
    public Image gauge;
    bool isOpenedUIMenu = false;
    private Car carInstance; // 전역 변수로 선언
    private float delta;

    void Start()
    {
        this.trans = this.GetComponent<Transform>();
        carInstance = Car.GetInstance(); // 전역 변수에 할당
        carInstance.menuUI.SetActive(false);
    }

    void Update()
    {
        ray = new Ray(this.trans.position, this.trans.forward);
        Debug.DrawRay(ray.origin, ray.direction * this.dist, Color.green);

        var mask = 1 << 6 | 1 << 7; // 레이어 마스크 설정
        if (Physics.Raycast(ray, out hit, dist, mask))
        {
            //gauge.fillAmount = 0;
            StartCoroutine(GazeButton());
        }
        else
        {
            delta = 0;
            gauge.fillAmount = 0;

            StartCoroutine(ReleaseButton());


            // 여기에서 메뉴 닫는 동작을 추가할 수 있습니다.
            // 예: carInstance.menuUI.SetActive(false);
        }
    }
    IEnumerator GazeButton()
    {

        if (this.hit.collider.gameObject.layer == 7 && carInstance != null)
        {
            carInstance.menuUI.SetActive(true);

            this.delta += Time.deltaTime;
            gauge.fillAmount = delta / 3;
        }
        else
        {

        }
        yield return null;
    }

    IEnumerator ReleaseButton()
    {
        if (this.hit.collider == null || this.hit.collider.gameObject == null)
        {

            carInstance.menuUI.SetActive(false);


        }
        yield return null;
    }
}

게이지를 채워서 예를 누르면 예가 찍히고
아니요를 누르면 창을 종료 시켰다.
using System.Collections;
using System.Collections.Generic;
using UnityEngine;
using UnityEngine.EventSystems;
using UnityEngine.UI;

public class EyeCast : MonoBehaviour
{
    private Transform trans;
    private Ray ray;
    private RaycastHit hit;
    public float dist = 10f;
    public Image gauge;
    private Car carInstance; // 전역 변수로 선언
    private float delta;
    public Button clickYes;
    public Button clickNo;
    private bool isYesClicked = false;
    private Coroutine coroutine;

    void Start()
    {
        this.trans = this.GetComponent<Transform>();
        carInstance = Car.GetInstance(); // 전역 변수에 할당
        carInstance.menuUI.SetActive(false);
    }

    void Update()
    {


        ray = new Ray(this.trans.position, this.trans.forward);
        Debug.DrawRay(ray.origin, ray.direction * this.dist, Color.green);

        var mask = 1 << 7; // 레이어 마스크 설정
        if (Physics.Raycast(ray, out hit, dist, mask))
        {
            //gauge.fillAmount = 0;

              if(coroutine != null)
            {
                StopCoroutine(coroutine);

            }

            StartCoroutine(GazeButton());

        }


        else if (Physics.Raycast(ray, out hit, dist, 1 << 6))
        {
            //gauge.fillAmount = 0;
            //StartCoroutine(GazeButton());


                StartCoroutine(GazeButton());
                StartCoroutine(ClickButton());


        }

        else
        {
            if (isYesClicked == true)
            {
                isYesClicked = false;
            }
            delta = 0;
            gauge.fillAmount = 0;

            StartCoroutine(ReleaseButton());


            // 여기에서 메뉴 닫는 동작을 추가할 수 있습니다.
            // 예: carInstance.menuUI.SetActive(false);
        }
    }
    IEnumerator GazeButton()
    {

        if (this.hit.collider.gameObject.layer == 7 || this.hit.collider.gameObject.layer == 6 && carInstance != null)
        {
            carInstance.menuUI.SetActive(true);

            this.delta += Time.deltaTime;
            gauge.fillAmount = delta / 2;
        }
        else
        {
            delta = 0;
            gauge.fillAmount = 0;
        }
        yield return null;
    }

    IEnumerator ClickButton()
    {
        if (this.hit.collider.gameObject.layer == 6)
        {
            this.delta += Time.deltaTime;
            if (gauge.fillAmount >= 1)
            {
                if (hit.collider.gameObject.name == "ButtonYes" && isYesClicked == false)
                {
                    isYesClicked = true;
                    Debug.Log("예를 입력하였습니다");
                }
                if (hit.collider.gameObject.name == "ButtonNo")
                {
                    carInstance.menuUI.SetActive(false);
                }
            }
        }
        yield return null;
    }


    IEnumerator ReleaseButton()
    {
        if (this.hit.collider == null || this.hit.collider.gameObject == null)
        {
            carInstance.menuUI.SetActive(false);
        }
        yield return null;
    }
}

마지막으로 레이어 이동시 게이지를 초기화 시키도록 구현하기 위해 수정을 하였다.

using System.Collections;
using UnityEngine;
using UnityEngine.UI;

public class EyeCast : MonoBehaviour
{
    private Transform trans;
    private RaycastHit hit;
    public float dist = 10f;
    public Image gauge;
    public Car car;
    public Button clickYes;
    public Button clickNo;

    private int lastLayer = 0;
    private string lastButton = "";

    float carCount = 0;
    float yesButtonCount = 0;
    float noButtonCount = 0;


    void Start()
    {
        this.trans = this.GetComponent<Transform>();
        car.menuUI.SetActive(false); // 처음엔 menu가 닫힌채로 시작

        StartCoroutine(ReleaseButton());
        StartCoroutine(GazeButton());
        StartCoroutine(ClickButton());
    }


    IEnumerator GazeButton()
    {
        while (true)
        {
            Ray ray = new Ray(this.trans.position, this.trans.forward);
            if (Physics.Raycast(ray, out hit, dist, 1 << 7)) // Layer 7 = Car
            {
                if (lastLayer != 7 && carCount < 2)
                {
                    carCount = 0;
                    gauge.fillAmount = 0;
                }
                else if (lastLayer != 7 && carCount >= 2)
                {
                    carCount = 2;
                    gauge.fillAmount = 1;
                }
                else if (lastLayer !=7 && carCount >= 2 && !car.menuUI.gameObject.activeSelf) // No 버튼으로 menu가 닫혔을때, 다시 초기화
                {
                    carCount = 0;
                    gauge.fillAmount = 0;
                }
                lastLayer = 7;
                lastButton = "";

                //car.menuUI.SetActive(true);  -> Car를 응시 했을 때, 바로 메뉴 오픈

                if (carCount < 2)
                {
                    carCount += Time.deltaTime;
                    gauge.fillAmount = carCount / 2;

                    if (gauge.fillAmount >= 1)
                    {
                        car.menuUI.SetActive(true); // -> Car를 응시 했을 때, 2초 후 메뉴 오픈
                    }
                }
            }
            yield return null;
        }
    }


    IEnumerator ClickButton()  // ButtonYes와 ButtonNo 콜라이더 사이에 공백이 있으면 ResetCountAndGauge 메서드(메뉴 닫힘 및 초기화)가 실행 될 수 있으니 유의
    {
        while (true)
        {
            Ray ray = new Ray(this.trans.position, this.trans.forward);
            if (Physics.Raycast(ray, out hit, dist, 1 << 6)) //Layer 6 = Button
            {
                if (hit.collider.gameObject.name == "ButtonYes")
                {
                    lastLayer = 6;

                    if (lastButton != "ButtonYes" && yesButtonCount < 2)
                    {
                        lastButton = "ButtonYes";
                        yesButtonCount = 0;
                        gauge.fillAmount = 0;
                    }
                    else if (lastButton != "ButtonYes" && yesButtonCount >= 2)
                    {
                        lastButton = "ButtonYes";
                        yesButtonCount = 2;
                        gauge.fillAmount = 1;
                    }
                    if (yesButtonCount < 2)
                    {
                        yesButtonCount += Time.deltaTime;
                        gauge.fillAmount = yesButtonCount / 2;

                        if (gauge.fillAmount >= 1)
                        {
                            Debug.Log("예를 입력하였습니다");
                            car.uiText.text = "차량 정보 확인"; // UI Text 변경
                        }
                    }
                }
                else if (hit.collider.gameObject.name == "ButtonNo")
                {
                    lastLayer = 6;

                    if (lastButton != "ButtonNo")
                    {
                        lastButton = "ButtonNo";
                        noButtonCount = 0;
                        gauge.fillAmount = 0;
                    }
                    if (noButtonCount < 2)
                    {
                        noButtonCount += Time.deltaTime;
                        gauge.fillAmount = noButtonCount / 2;

                        if (gauge.fillAmount >= 1)
                        {
                            car.menuUI.SetActive(false);

                            // Count 및 Text 초기화
                            car.uiText.text = "차량의 정보를 보시겠습니까?";
                            carCount = 0;
                            yesButtonCount = 0;
                            noButtonCount = 0;
                            Debug.Log("아니오를 입력하였습니다. 메뉴를 종료합니다.");
                        }
                    }
                }
            }
            yield return null;
        }
    }


    IEnumerator ReleaseButton()
    {
        while (true)
        {
            Ray ray = new Ray(this.trans.position, this.trans.forward);
            if (!Physics.Raycast(ray, out hit, dist))
            {
                //car.menuUI.SetActive(false); -> Car, 버튼 어느것도 응시하지 않으면 menu 닫음
                gauge.fillAmount = 1;
                lastLayer = 0;
                lastButton = "";
            }
            yield return null;
        }
    }


}
using System.Collections;
using System.Collections.Generic;
using UnityEditor;
using UnityEngine;
using UnityEngine.EventSystems;
using UnityEngine.InputSystem.LowLevel;
using UnityEngine.UI;
using TMPro;

public class Car : MonoBehaviour, IPointerEnterHandler, IPointerExitHandler, IGvrPointerHoverHandler
{

    private Coroutine coroutine;
    public GameObject menuUI;
    public Text uiText; // menuUI Text

    private void Start()
    {
        //menuUI.SetActive(false);
    }


    public void OnGvrPointerHover(PointerEventData eventData)
    {
        //Debug.Log("Hover");
    }


    public void OnPointerEnter(PointerEventData eventData)
    {
        //coroutine = StartCoroutine(CoClick());
        //Debug.Log("Enter");
        ////menuUI.SetActive(true);
        //Debug.Log("이벤트 대상: " + eventData.pointerEnter.name);
    }


    private IEnumerator CoClick()
    {
        float delta = 0f;
        while (true)
        {
            delta += Time.deltaTime;
            if(delta >= 3)
            {
                Debug.LogFormat("Clicked , {0}", delta);
                delta = 0f;
            }
            yield return null;
        }
    }

    public void OnPointerExit(PointerEventData eventData)
    {
        //Debug.Log("Exit");
        //menuUI.SetActive(false);
        //StopCoroutine(coroutine);
    }
}'산대특 > VRAR' 카테고리의 다른 글
| Create Ghost Reticles (0) | 2024.04.18 |
|---|---|
| Oculus Settings and Grab (0) | 2024.04.17 |
| VR로 360도 동영상 다운로드 후 적용하기 + 오큘러스 적용 (0) | 2024.04.16 |
| 캐릭터 이동지점 변경시 VR시점 변경 (0) | 2024.04.12 |
| VR Setting 문제 (0) | 2024.04.12 |