메서드 오버로딩?

다형성을 구현하는 방법중 하나

즉, 하나 이상의 형태를 취할 수 있는 능력

https://www.youtube.com/watch?v=UQmok_QRSKY&list=PLTFRwWXfOIYBmr3fK17E0VhKPyYrGy75z&index=36


메서드 오버로딩은

동일한 이름을 가진 여러 메서드를 정의하는 것


메서드 오버로딩을 사용하는 때


1. 매개변수의 수 변경

2. 다른 타입의 매개변수 사용

3. 서로 다른 타입의 매개변수 순서 변경
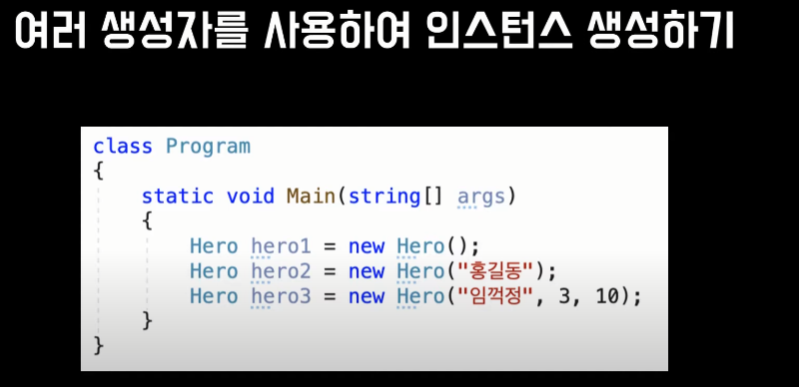


생성자 오버로딩


using System;
using System.Collections.Generic;
using System.Linq;
using System.Text;
using System.Threading.Tasks;

namespace Step36
{
    internal class Program
    {
        static void Main(string[] args)
        {
            //Calculator calc = new Calculator();
            //int result = calc.Add(1, 2);
            //Console.WriteLine(result);

            //result = calc.Add(1, 2, 3);
            //Console.WriteLine(result);

            //calc.Subtract(1.3f, 1.5f);
            //calc.Subtract(5, 1.5f);
            //calc.Subtract(10f, 5);

            //calc.Multiple(1.5f, 2);
            //calc.Multiple(2, 1.5f);
            
            //생성자 오버로딩
            Hero hong = new Hero();
            Hero lim = new Hero("임꺽정");
            Hero jang = new Hero("장길산", 3, 10);
            
        }
    }
}


using System;
using System.Collections.Generic;
using System.Linq;
using System.Text;
using System.Threading.Tasks;

namespace Step36
{
    internal class Calculator
    {
        //클래스가 생성되면 기본 생성자를 만들자

        public Calculator()
        {

        }

        //메서드 오버로딩
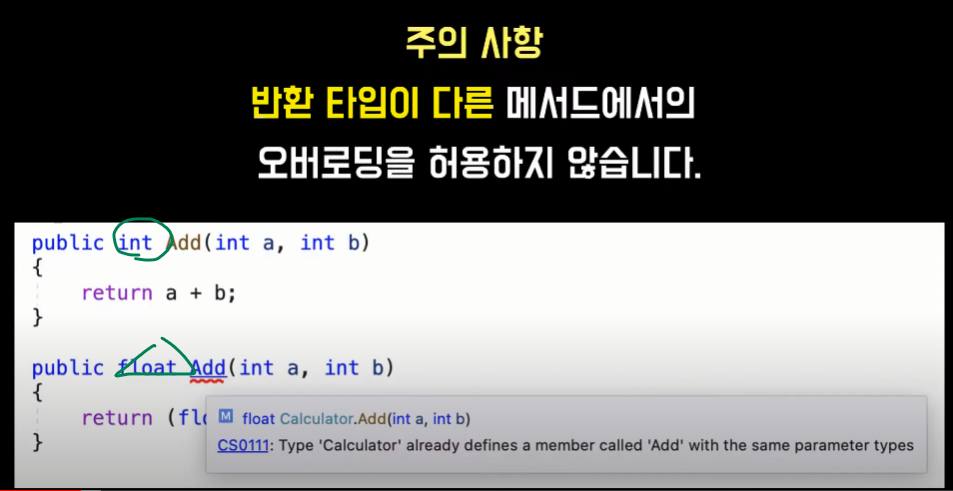
        public int Add(int a, int b)
        {
            int result = a + b;
            return result;
        }
        //다른 매개변수의 수
        public int Add(int a, int b, int c)
        {
            int result = a + b + c;
            return result;
        }

        public int Subtract(int a, int b)
        {
            int result = a - b;
            return result;
        }
        //다른 타입의 매개변수
        public int Subtract(float a, float b)
        {
            int result = Convert.ToInt32(a - b);
            return result;
        }

        public int Subtract(int a, float b)
        {
            int result = a - (int)b;
            return result;
        }
        //서로다른 매개변수의 순서 변경
        public int Multiple(int a, float b)
        {
            int result = a * (int)b;
            return result;
        }

        public int Multiple(float a, int b)
        {
            int result = (int)a * b;
            return result;
        }
        
        //반환타입이 다른것은 오버로딩 불가능

    }
}


using System;
using System.Collections.Generic;
using System.Linq;
using System.Text;
using System.Threading.Tasks;

namespace Step36
{
    internal class Hero
    {
        //생성자
        public Hero()
        {
            Console.WriteLine("매개변수가 없는 기본 생성자");
        }

        //생성자 오버로딩
        public Hero(string anme)
        {
            Console.WriteLine("매개변수가 1개 있는 생성자");

        }

        //생성자 오버로딩
        public Hero(string name, int damage, int maxHp)
        {
            Console.WriteLine("매개변수가 3개 있는 생성자");

        }
    }
}

'낙서장 > C#' 카테고리의 다른 글

virtual ,override, base  (2) 2024.03.08
상속과 다형성  (1) 2024.03.08
흐름 제어  (1) 2024.02.26
데이터를 가공하는 연산자  (0) 2024.02.25
데이터를 담는 변수와 상수  (0) 2024.02.22

구조

이때 주의할것은 뭐가 위에 올라와야 하는지 구조를 잡는 것이다.


using System.Collections;
using System.Collections.Generic;
using UnityEngine;
using UnityEngine.UI;
using TMPro;

public class UISkillButton : MonoBehaviour
{
    [SerializeField] private Button btn;
    [SerializeField] private int maxCooltime = 10;
    [SerializeField] private TMP_Text cooltimeText;
    [SerializeField] private Image slier;
    private float cooltime;
    private bool isCoolTime;

    void Start()
    {
        btn.onClick.AddListener(() => {
            if (IsAvaliable())
            {
                this.UseSkill();
            }
            else
            {
                Debug.Log("아직은 사용할수 없습니다.");
            }
        });

        this.Init();
    }

    private void Init()
    {
        Debug.Log("스킬버튼을 초기화 합니다.");
        this.cooltime = this.maxCooltime;
        this.slier.fillAmount = 0;
        this.cooltimeText.text = this.cooltimeText.ToString();
        this.cooltimeText.gameObject.SetActive(false);
        this.isCoolTime = false;
    }

    private void UseSkill()
    {
        Debug.Log("스킬을 사용했습니다.");
        this.cooltimeText.gameObject.SetActive(true);
        this.cooltimeText.text = this.cooltime.ToString();
        this.slier.fillAmount = 1;
        this.StartCoroutine(this.CoWaitForCoolTime());
    }

    private IEnumerator CoWaitForCoolTime()
    {
        this.isCoolTime = true;

        while (true)
        {
            this.cooltime -= Time.deltaTime;
            this.cooltimeText.text = Mathf.RoundToInt(this.cooltime).ToString();
            this.slier.fillAmount = this.cooltime / this.maxCooltime;
            if (this.cooltime <= 0)
            {
                break;
            }
            yield return null;
        }

        this.isCoolTime = false;

        Debug.Log("스킬을 사용할수 있습니다.");

        this.Init();
    }

    private bool IsAvaliable()
    {
        return !isCoolTime;
    }
}


'낙서장 > UIUX' 카테고리의 다른 글

Slider  (0) 2024.03.18
Switch Button  (0) 2024.03.18
Button and Inputfield  (0) 2024.03.18

우선 한 버튼을 누를때마다 동작을 변화시킬 것이므로

캔버스에 빈 버튼안에 on, off로 나누었다.

텍스트는 보이지 않게 이미지를 껐다.


자리를 잘 잡아주어 이렇게 분류한다.

기본을 켜져있을 때로 주었고

눌렀을 때 !을 사용해서 서로의 이미지를 교차로 보일 수 있게 하였다.

using System.Collections;
using System.Collections.Generic;
using System.Runtime.CompilerServices;
using UnityEngine;
using UnityEngine.UI;

public class Switch : MonoBehaviour
{
    [SerializeField] private Button btnSwitch;
    [SerializeField] private GameObject btnOn;
    [SerializeField] private GameObject btnOff;
    private bool isOn = true;

    private void Start()
    {
        btnOn.SetActive(isOn);
        btnOff.SetActive(!isOn);
        
    }

    private void Update()
    {
        this.btnSwitch.onClick.AddListener(() => {
            OnOff();
        });
    }

    void OnOff()
    {
        isOn = !isOn;
        btnOn.SetActive(isOn);
        btnOff.SetActive(!isOn);
    }

}

https://docs.unity3d.com/ScriptReference/GameObject.SetActive.html


Unity - Scripting API: GameObject.SetActive

A GameObject may be inactive because a parent is not active. In that case, calling SetActive will not activate it, but only set the local state of the GameObject, which you can check using GameObject.activeSelf. Unity can then use this state when all paren

docs.unity3d.com


'낙서장 > UIUX' 카테고리의 다른 글

Skill Button  (0) 2024.03.18
Slider  (0) 2024.03.18
Button and Inputfield  (0) 2024.03.18

우선 가이드 라인을 캔버스에 적용한후

플레이하는 기계에 따라 유동적으로 변화할 수 있게

스케일모드와 레퍼런스 솔루션을 적용


알베도를 설정하여 가이드라인을 흐리게 설정


데모씬으로 들어가서 오브젝트들을 하나씩 활성화 시켜본 후 필요한 것을 찾고

그 안에있는 컴포넌트들을 확인해야 한다.

그리고 이런 느낌으로 메모장에 적어둔다.

버튼을 만들것인데 TMP로 만들것이다.

https://docs.unity3d.com/Packages/com.unity.textmeshpro@1.0/api/TMPro.TextMeshProUGUI.html


Class TextMeshProUGUI

Class TextMeshProUGUI Inherited Members Namespace: TMPro Assembly : solution.dll Syntax public class TextMeshProUGUI : TMP_Text, ILayoutElement Fields m_subTextObjects Declaration protected TMP_SubMeshUI[] m_subTextObjects Field Value Properties autoSizeTe

docs.unity3d.com


아까 메모장에 적어뒀던걸로 검색해서 이런식으로 assign


가져오면 이런식으로 sliced가 되있을 것인데 사이즈를 바꿔줄 것이다.

이러면 기본적인 크기가 조절되는데 다시 sliced로 바꿔야 이미지 크기를 조절할때

이미지가 찌그러지는 상황을 방지할 수 있다.


UI를 만들때 기초이자 필수인 과정인데

가이드란과 비교해서 그 위해 이미지를 덮고 이미지와 텍스트를껐다켰다하며 실제와 같은지 비교하고 조정한다.

조정할 것으로는 이미지크기, 텍스트, 색상 같은 것들이 있다.

UI들을 관리해줄 빈오브젝트 생성 후 스크립트 어싸인


이런식으로 직접 할당해줄수 있지만 나중에 컴포넌트들이 많으면 관리하기가 힘들고

혹시나 나중에 디자이너들과 협업을 할때 쉽게 건들여질 수 있는 부분으로 권장하지 않는다.

따라서 초기화

이런식으로 인스펙터에서 할당하지 않아도 클릭하면 인지될 수 있도록 코드를 구현할 것이다.

using System.Collections;
using System.Collections.Generic;
using UnityEngine;
using UnityEngine.UI;

public class BlueButton : MonoBehaviour
{
    [SerializeField] public Button blueButton;

    private void Start()
    {
        this.blueButton.onClick.AddListener(() => {
            Debug.Log("Blue Button Clicked!");
        });
    }
}


이제 Inputfield를 만들 것인데 버튼과 마찬가지로 필요한 텍스쳐들을 찾아낸다.

칼라도 잊지말고 찾자

Allignment는 사실 크게 신경쓰지 않아도 된다.

위에 있는 것들은 버튼을 만들때 필요했던 것들 아래는 이번에 만들 인풋필드에 필요한 것들이다.

.

기존에 인풋필드에서 사용하는 폰트는 한글이 없으므로 설치후

window - textmeshpro - font asset creator

글자는 각 숫자로 정리 되어있는데 이것은 한글 범위를 찾아서 넣어줘고 제너레이트 해야 한다.


https://docs.unity3d.com/Packages/com.unity.textmeshpro@4.0/manual/FontAssetsCreator.html


Font Asset Creator | TextMeshPro | 4.0.0-pre.2

Font Asset Creator The Font Asset Creator converts Unity font assets into TextMesh Pro font assets. You can use it to create both Signed Distance Field (SDF) fonts and bitmap fonts. When you create a new font Asset, TextMesh Pro generates the Asset itself,

docs.unity3d.com

제너레이트 후 세이브


아까는 onClick()를 썼듯이 이번엔 이것을 사용할 것이다.

어싸인

using System.Collections;
using System.Collections.Generic;
using TMPro;
using UnityEngine;

public class InputField : MonoBehaviour
{
    [SerializeField] public TMP_InputField inputField;
    void Start()
    {
        this.inputField.onValueChanged.AddListener((word) =>
        {
            Debug.LogFormat("{0}", word);
        });
    }
}

이제 입력을 하고 버튼을 누르면 출력되게 할 것이다.

using UnityEngine;
using UnityEngine.UI;

public class BlueButton : MonoBehaviour
{
    public Button blueButton;
    private ShowText showText;

    void Start()
    {
        this.showText = GetComponent<ShowText>();
        blueButton.onClick.AddListener(() =>
        {
            showText.ShowMessage();
        });
    }
}


using TMPro;
using UnityEngine;

public class ShowText : MonoBehaviour
{
    public TMP_InputField inputField;

    public void ShowMessage()
    {
        Debug.Log(inputField.text);
    }

    //public void SubscribeToInputFieldChange()
    //{
    //    inputField.onValueChanged.AddListener((word) =>
    //    {
    //    });
    //}
}

'낙서장 > UIUX' 카테고리의 다른 글

Skill Button  (0) 2024.03.18
Slider  (0) 2024.03.18
Switch Button  (0) 2024.03.18

적 비행기가 피격시 스프라이트 랜더러를 사용해

2가지 이미지로

피격시 화면이 바뀌고 정해진 시간후에 다시 원래모습으로 돌아오게 한다.


애니메이션을 추가하여 적비행기가 체력이 다 닳을시 폭파하는 애니메이션을 추가하였다.

폭발 애니메이션은 구현하였지만

스프라이트 렌더러에 저장했던 이미지는 불러와지지 않는다.


using System.Collections;
using System.Collections.Generic;
using UnityEngine;

public class Enemy : MonoBehaviour
{
    public float speed;
    public int health;
    public Sprite[] sprites;
    private Animator anim;

    SpriteRenderer spriteRenderer;
    Rigidbody2D rigid;

    void Start()
    {
        spriteRenderer = GetComponent<SpriteRenderer>();
        rigid = GetComponent<Rigidbody2D>();
        rigid.velocity = Vector2.down * speed;

        anim = GetComponent<Animator>();
    }

    void ReturnSprite()
    {
        spriteRenderer.sprite = sprites[0];
    }

    public void OnHit(int dmg)
    {
        health -= dmg;
        spriteRenderer.sprite = sprites[1];
        Invoke("ReturnSprite", 0.1f);

        if (health <= 0)
        {
            anim.SetBool("EnemyDie", true);

            Destroy(gameObject, 0.2f);
        }
    }

    private void OnTriggerEnter2D(Collider2D collision)
    {
        if (collision.gameObject.tag == "BorderBullet")
        {
            Destroy(gameObject);
        }
        else if (collision.gameObject.tag == "Bullet")
        {
            Bullet bullet = collision.gameObject.GetComponent<Bullet>();
            OnHit(bullet.dmg);
            Destroy(collision.gameObject);
        }
    }
}


Enemy컨트롤러를 체크한 후 auto live link로 실행이 잘 되는지 확인했다.

죽었을때 폭발 애니메이션은 정상적으로 진행하고 있었다.


실행 순서에 문제가 있나 확인하기 위해 Unity LifeCycle을 찾아보았다.

https://docs.unity3d.com/kr/current/Manual/ExecutionOrder.html


이벤트 함수의 실행 순서 - Unity 매뉴얼

Unity 스크립트를 실행하면 사전에 지정한 순서대로 여러 개의 이벤트 함수가 실행됩니다. 이 페이지에서는 이러한 이벤트 함수를 소개하고 실행 시퀀스에 어떻게 포함되는지 설명합니다.

docs.unity3d.com


해결 방법으로 Explosion 자체를 프리팹으로 만들어서 프리팹을 불러오며

그 프리팹이 실행되고 나서 비행기를 파괴시켰다.


폭발 애니메이션


빈 오브젝트에 스크립트와 애니메이션 컨트롤러를 넣고 프리팹화를 진행하였다.


폭발 스크립트에 코루틴이 돌아가게 했고 0.5초 후에 폭발(게임오브젝트) 파괴


적 스크립트

우선 폭발 프리팹을 가지고 있어야 하므로 선언

public GameObject explosionPrefab;


체력이 0이하 일시 폭발을 만들어주었고 폭발 효과 시간을 지정하였다.


완성된 모습


using System.Collections;
using System.Collections.Generic;
using UnityEngine;

public class PlayerController : MonoBehaviour
{
    public float speed = 3f;
    public bool isTouchTop;
    public bool isTouchLeft;
    public bool isTouchRight;
    public bool isTouchBottom;

    public float maxShortDelay = 0.1f;//실제 딜레이
    public float curShortDelay;//한발 쏜 딜레이
    
    public GameObject bulletObjA;
    private Animator anim;
    void Start()
    {
        anim = GetComponent<Animator>();
    }

    void Update()
    {
        Move();
        Fire();
        Reload();
    }

    void Move()
    {
        Vector3 curPos = this.transform.position;
        float h = Input.GetAxisRaw("Horizontal");
        if ((isTouchRight && h == 1) || (isTouchLeft && h == -1))
            h = 0;
        float v = Input.GetAxisRaw("Vertical");
        if ((isTouchTop && v == 1) || (isTouchBottom && v == -1))
            v = 0;
        Vector3 nextPos = new Vector3(h, v, 0) * speed * Time.deltaTime;
        this.transform.position = curPos + nextPos;

        if(Input.GetButtonDown("Horizontal") || Input.GetButtonDown("Vertical"))
        {
            anim.SetInteger("Input", (int)h);
        } 
    }

    void Fire()
    {   
        if (curShortDelay < maxShortDelay)
            return;
        if (Input.GetKey(KeyCode.Space))
        {
           
            GameObject bullet = Instantiate(bulletObjA, transform.position, transform.rotation);
            Rigidbody2D rigid = bullet.GetComponent<Rigidbody2D>();
            rigid.AddForce(Vector2.up * 10, ForceMode2D.Impulse);

            curShortDelay = 0f;
        }
    }
    
    void Reload()
    {
        curShortDelay += Time.deltaTime;
    }


    private void OnTriggerEnter2D(Collider2D collision)
    {
        if(collision.gameObject.tag == "Border")
        {
            switch (collision.gameObject.name)
            {
                case "Top":
                    isTouchTop = true;
                    break;
                case "Bottom":
                    isTouchBottom = true;
                    break;
                case "Left":
                    isTouchLeft = true;
                    break;
                case "Right":
                    isTouchRight = true;
                    break;
            }
        }
    }

    private void OnTriggerExit2D(Collider2D collision)
    {
        switch (collision.gameObject.name)
        {
            case "Top":
                isTouchTop = false;
                break;
            case "Bottom":
                isTouchBottom = false;
                break;
            case "Left":
                isTouchLeft = false;
                break;
            case "Right":
                isTouchRight = false;
                break;
        }
    }
}


using System.Collections;
using System.Collections.Generic;
using UnityEngine;

public class Bullet : MonoBehaviour
{
    public int dmg;
    private void OnTriggerEnter2D(Collider2D collision)
    {
        if(collision.tag == "BorderBullet")
        {
            Destroy(gameObject);
        }
    }
}


using System.Collections;
using System.Collections.Generic;
using UnityEngine;

public class Enemy : MonoBehaviour
{
    public float speed;
    public int health;
    public Sprite[] sprites;

    SpriteRenderer spriteRenderer;
    Rigidbody2D rigid;
    public GameObject explosionPrefab;
    void Start()
    {
        spriteRenderer = GetComponent<SpriteRenderer>();
        rigid = GetComponent<Rigidbody2D>();
        rigid.velocity = Vector2.down * speed;

    }

    void ReturnSprite()
    {
        spriteRenderer.sprite = sprites[0];
    }

    public void OnHit(int dmg)
    {
        health -= dmg;
        spriteRenderer.sprite = sprites[1];
        Invoke("ReturnSprite", 0.1f);
        if (health <= 0)
        {
            GameObject explosion = Instantiate(explosionPrefab, transform.position, Quaternion.identity);
            Destroy(explosion, 1.0f); // 폭발 효과는 1초 후에 파괴
            Destroy(gameObject); // 적도 파괴
            //Destroy(gameObject, 0.2f);
        }
    }

    private void OnTriggerEnter2D(Collider2D collision)
    {
        if (collision.gameObject.tag == "BorderBullet")
        {
            Destroy(gameObject);
        }
        else if (collision.gameObject.tag == "Bullet")
        {
            Bullet bullet = collision.gameObject.GetComponent<Bullet>();
            OnHit(bullet.dmg);
            Destroy(collision.gameObject);
        }
    }
}


using System.Collections;
using System.Collections.Generic;
using UnityEngine;

public class GameManager : MonoBehaviour
{
    public GameObject[] enemyObjs;
    public Transform[] spawnPoints;

    public float maxSpawnDelay;
    public float curSpawnDelay;

    void Update()
    {
        curSpawnDelay += Time.deltaTime;

        if(curSpawnDelay > maxSpawnDelay)
        {
            SpawnEnemy();
            maxSpawnDelay = Random.Range(0.5f, 3f);
            curSpawnDelay = 0;
        }
    }

    void SpawnEnemy()
    {
        int ranEnemy = Random.Range(0, 3);
        int ranPoint = Random.Range(0, 5);

        Instantiate(enemyObjs[ranEnemy],
            spawnPoints[ranPoint].position,
            spawnPoints[ranPoint].rotation);
    }
}


using System.Collections;
using System.Collections.Generic;
using UnityEngine;

public class Explosion : MonoBehaviour
{
    private Animator anim;


    public void OnEnable()
    {
        anim = GetComponent<Animator>();
        StartCoroutine(CoExplosion());
    }

    IEnumerator CoExplosion()
    {
        yield return new WaitForSeconds(0.5f);
        Destroy(gameObject);
    }
}

virtual?


요약하자면,,

부모 클래스에서 virtual 키워드를 사용하여 함수를 만들면, 자식 클래스에서 이 함수를 재정의 할 수 있도록 허용


특징 :

 1. virtual 이 붙은 함수는 자식 클래스에서 재정의가 가능하다.

 2. 자식 클래스에서는 new 또는 override 키워드가 사용가능하다.

    - override는 재정의를 하겠다는 확장의 의미이고, new 는 기본 클래스를 숨기는 의미이다. 

 3. 자식클래스의 함수 시그니쳐가 동일해야 재정의가 가능하다.

 4. 자식클래스의 함수는 base 키워드를 사용해 부모 클래스의 함수를 호출 할 수 있다.

 5. abstract 와는 달리 자식클래스에서 구현은 선택이다. (구현 안하면 부모의 함수 사용)

 6. static, abstract, private,sealed 키워드와는 사용이 불가능하다.


그럼 왜 사용할까?

public class Monster
{
    public virtual void hit()
    {
        Console.WriteLine("Monster hit");
    }
}
 
public class Orc : Monster
{
    public override void hit()
    {
        Console.WriteLine("Orc hit");
    }
}
 
public class Elf : Monster
{
    public new void hit()
    {
        Console.WriteLine("Elf hit");
    }
}
 
public class Wolf : Monster
{
    public void hit()
    {
        Console.WriteLine("Wolf hit");
    }
}


class Program
 {
     static void Main(string[] args)
     {
         Monster monster1 = new Monster();
         Orc monster2 = new Orc();
         Elf monster3 = new Elf();
         Wolf monster4 = new Wolf();
 
         monster1.hit();
         monster2.hit();
         monster3.hit();
         monster4.hit();
 
         Monster monster5 = new Orc();
         Monster monster6 = new Elf();
         Monster monster7 = new Wolf();
 
 
         Console.WriteLine("////////////////////");
         monster5.hit();
         monster6.hit();
         monster7.hit();
 
     }
 }


이런식으로 하나씩 입력을 하면 원하는 값은 얻을 수 있지만

나중에 더 많아지면 코드가 길어지면 자연스럽게 코드가 무거워지고 가독성이 떨어지게 된다.


virtual 키워드로 지정된 메서드는 가상 메서드가 되는데 가상 메서드는 자식 클래스가 오버라이드 할 수 있도록 허용된다.

자식 클래스는 override 키워드를 사용해 부모 클래스의 가상메서드를 재정의 할 수 있다.

override?


기반 클래스에서 선언된 메소드를 자식 클래스에서 재정의

기반 클래스에서 오버라이딩할 메소드를 미리 virtual로 한정

파생 클래스는 virtual 메소드를 override한정자를 이용하여 재선언


즉, 가상메서드는 자식 클래스가 오버라이드 할 수 있도록 허용된 메서드


base?


using System.Collections;
using System.Collections.Generic;
using UnityEngine;

public class Person : MonoBehaviour
{
   public virtual void Work()
    {
        Debug.Log("일하다");
    }
}


using System.Collections;
using System.Collections.Generic;
using UnityEngine;

public class Salesman : Person {
    public override void Work()
    {
        base.Work();
        Debug.Log("나는 셀러리맨이다");
    }
    private void Start()
    {
        Work();
    }
}


보기와 같이 메서드의 이름이 Work로 같이 정의되어도 자식클래서에서 같은 이름 접근가능하고

부모클래스를 호출할 수 있다.


혹시나 부모클래스의 메소드가 자식 클래스에 의해 변형이 될가 봐 테스트 해보았고,

using System.Collections;
using System.Collections.Generic;
using UnityEngine;

public class Salesman : Person {
    public override void Work()
    {
        base.Work();
        Debug.Log("나는 셀러리맨이다");
    }
    private void Start()
    {
        Person person = new Person();
        person.Work();
    }
}


결론은 보기과 같이 "아니" 다.


ChatGpt에게 수업이 끝나기 전 간단한 예제를 내달라 했는데 혼자서 입력해봤던 것과 난이도가 같아서

더 어려운 예제를 풀 것이다.

using System.Collections;
using System.Collections.Generic;
using UnityEngine;

public class Fish : MonoBehaviour
{
    //1.물고기를 나타내는 Fish 클래스를 작성합니다.
    //이 클래스에는 Swim() 메서드가 있어야 합니다. 이 메서드는 "물고기가 헤엄칩니다."라는 메시지를 출력합니다.
    public virtual void Swim()
    {
        Debug.Log("물고기가 헤엄칩니다.");
    }

    private void Start()
    {
        Swim();
    }
}


using System.Collections;
using System.Collections.Generic;
using UnityEngine;

public class Goldfish : Fish
{
    //2.Fish 클래스를 상속받는 Goldfish 클래스를 작성합니다.
    //이 클래스에는 Swim() 메서드를 오버라이드하여 "금붕어가 헤엄칩니다."라는 메시지를 출력하도록 구현합니다.

    public override void Swim()
    {
        Debug.Log("금붕어가 헤엄칩니다.");
    }
}


자식클래스가 먼저 호출되고 부모클래스가 잇따라 호출되었다.

'낙서장 > C#' 카테고리의 다른 글

[C#] 메서드 오버로딩  (0) 2024.06.02
상속과 다형성  (1) 2024.03.08
흐름 제어  (1) 2024.02.26
데이터를 가공하는 연산자  (0) 2024.02.25
데이터를 담는 변수와 상수  (0) 2024.02.22

상속이란?


다른 클래스로부터 코드를 물려받는 것


상속의 대상 : 클래스의 멤버(필드, 메소드, 프로퍼티 등)

새로 선언하는 클래스 이름 뒤에 클론( : ) 과 기반 클래스의 이름을 표기하여 상속

물려주는 클래스 : 기반/부모 클래스, 물려받는 클래스 : 파생/자식 클래스


하나의 클래스가 하나의 상속만 되지만, 전이적으로 여러개를 이어서 사용 가능


상속을 받을 때 클래스명 뒤에 MonoBehaviour를 지우고 상속받을 부모 클래스의 이름을 추가


3개의 오브젝트에 각각의 스크립트를 부착하였다.


using System.Collections;
using System.Collections.Generic;
using UnityEngine;

public class Monster : MonoBehaviour
{
    public void Attack()
    {
        Debug.Log("공격");
    }
}
using System.Collections;
using System.Collections.Generic;
using UnityEngine;

public class Orc : Monster
{
    public void WarCry()
    {
        Debug.Log("전투함성");
        Attack();
    }
    //public void Start()
    //{
    //    WarCry();
    //}
}
using System.Collections;
using System.Collections.Generic;
using UnityEngine;

public class Dragon : Orc
{
    public void Fly()
    {
        Debug.Log("날기");
        Attack();
        WarCry();
    }
    private void Start()
    {
        Fly();
    }
}

실행을 해보면 이런식의 순서로 호출된다.

  1. Dragon 클래스의 Start 메서드가 호출
  2. Start 메서드 내에서 Fly 메서드가 호출
  3. Fly 메서드 내에서 Attack 메서드가 호출. 이때, Dragon 클래스가 Orc 클래스를 상속하고 있으므로,                          Orc 클래스의 Attack 메서드가 실행됩니다.
  4. Attack 메서드가 실행되고 "공격"이라는 메시지가 출력
  5. Fly 메서드 내에서 WarCry 메서드가 호출. WarCry 메서드는 Orc 클래스에 정의되어 있다.
  6. WarCry 메서드가 실행되고 "전투함성"이라는 메시지가 출력된다.
  7. WarCry 메서드 내에서 Attack 메서드가 호출되는데, Orc 클래스가 Monster 클래스를 상속하고 있으므로,        Monster 클래스의 Attack 메서드가 실행됩니다.
  8. Attack 메서드가 실행되고 다시 "공격"이라는 메시지가 출력된다.

쉽게 말해 부모 자식 관계가 Monster -> Oak -> Dragon 순으로 되어있으므로

서로 상속되어 클래스를 가져와 사용할 수 있다.


주의

Unity에서 MonoBehaviour를 상속한 클래스에서 Start 메서드를 사용할 때,

상속 관계에 있는 클래스의 Start 메서드 실행 순서는 보장되지 않는다.

이는 Unity 엔진이 각각의 MonoBehaviour를 포함한 오브젝트들에 대해 독립적으로 처리하기 때문이다.


자식클래스는 부모클래스의 속성을 받아서 사용할 수 있지만

반대로 일반적으로 부모클래스는 자식클래스의 속성과 메소드를 사용할 수 없다.


다형성이란?


오류1. WarCry()를 하면 몬스터들의 대미지를 올려주려다 오류가 발생했다.

using System.Collections;
using System.Collections.Generic;
using UnityEngine;

public class Orc : Monster
{
    Monster[] monsters = GameObject.FindObjectsOfType<Monster>();
    public void WarCry()
    {
        Debug.Log("전투함성");

        //모든 몬스터 공격력 + 10 증가
       
        for(int i = 0; i < monsters.Length; i++)
        {
            monsters[i].damage += 10;
            Debug.LogFormat("추가된 공격력은 {0}", monsters[i].damage);
        }

    }
    private void Start()
    {
        for (int i = 0; i < monsters.Length; i++)
        {
            Debug.LogFormat("기본 공격력은 {0}", monsters[i].damage);
        }
        WarCry();
    }

}


이것에 대해 알아보니

Unity에서는 MonoBehaviour의 생성자나 인스턴스 필드 초기화자에서 FindObjectsOfType를 호출하는 것을

허용하지 않으므로 대신에 Awake나 Start 메서드에서 호출해야 한다.

따라서 Orc 클래스의 생성자에서 FindObjectsOfType를 호출하는 것은 허용되지 않는다.

Orc 클래스의 WarCry 메서드 내에서 호출하거나, Orc 클래스의 Awake나 Start 메서드에서 호출해야 한다고 한다.


오류2. 호출이 2번된다.

using System.Collections;
using System.Collections.Generic;
using UnityEngine;

public class Monster : MonoBehaviour
{
    public float damage = 10f;
    public void Attack()
    {
        Debug.Log("공격");
    }

}


using System.Collections;
using System.Collections.Generic;
using UnityEngine;

public class Orc : Monster
{
    public void WarCry()
    {
        Debug.Log("전투함성");

        //모든 몬스터 공격력 + 10 증가
        Monster[] monsters = GameObject.FindObjectsOfType<Monster>();

        for (int i = 0; i < monsters.Length; i++)
        {
            monsters[i].damage += 10;
            Debug.LogFormat("추가된 공격력은 {0}", monsters[i].damage);
        }

    }
    private void Start()
    {
        Monster[] monsters = GameObject.FindObjectsOfType<Monster>();

        for (int i = 0; i < monsters.Length; i++)
        {
            Debug.LogFormat("기본 공격력은 {0}", monsters[i].damage);
        }
        WarCry();
    }

}


주어진 코드에서 Orc 클래스의 Start 메서드에서 WarCry 메서드를 호출하기 전에

FindObjectsOfType<Monster>()를 사용하여 몬스터 배열을 얻고 있다.

FindObjectsOfType<Monster>()는 현재 씬에 있는 모든 Monster 클래스의 인스턴스를 찾아 배열로 반환한다.

Start 메서드에서 이를 호출하여 몬스터 배열을 가져오고,

그 다음에 WarCry 메서드를 호출하는 것은 상황에 따라 문제가 될 수 있다.

만약 Start 메서드가 호출될 때 씬에 이미 생성된 몬스터가 있다면,

WarCry 메서드에서 다시 같은 몬스터 배열을 가져오게 되어 몬스터 배열이 중복되어 보일 수 있다.

따라서 Orc 클래스의 Start 메서드에서 WarCry 메서드를 호출하기 전에 몬스터 배열을 가져오는 부분을 제거하면

이런 문제를 해결할 수 있고, WarCry 메서드에서만 몬스터 배열을 가져오도록하면 된다.


여기서 자세히 보아야할 것은 다형성을 이용한 패턴이라는 것이다.


https://docs.unity3d.com/ScriptReference/Object.FindObjectsOfType.html


Unity - Scripting API: Object.FindObjectsOfType

This does not return assets (such as meshes, textures or prefabs), or objects with HideFlags.DontSave set. Objects attached to inactive GameObjects are only included if inactiveObjects is set to true. Use Resources.FindObjectsOfTypeAll to avoid these limit

docs.unity3d.com


명시한 타입의 모든 오브젝트를 찾아 배열로 반환, 씬에 있는 모든 Monster 타입의 오브젝트가 monsters배열에 저장됨

'낙서장 > C#' 카테고리의 다른 글

[C#] 메서드 오버로딩  (0) 2024.06.02
virtual ,override, base  (2) 2024.03.08
흐름 제어  (1) 2024.02.26
데이터를 가공하는 연산자  (0) 2024.02.25
데이터를 담는 변수와 상수  (0) 2024.02.22

흐름 제어 - 코드 실행 순서를 결정하는 것

분기 - 제어 흐름을 여러 갈래로 나누는 것
         단, 프로그램은 한 번에 하나만 실행 가능

분기문1 : if


분기문2 : switch + break

int input = Convert.ToInt32(Console.ReadLine());

int score = (int)(Math.Truncate(input/10.0) * 10);
// 1의 자리 버림

string grade = "";

switch (score)
{
    case 90:
       grade = "A";
       break;
       
    case 80:
       grade = "B";
       break;
       
    case 70:
       grade = "C";
       break;
       
    case 60:
       grade = "D";
       break;
       
    default:
       grade = "F";
       break;
}


int input = Convert.ToInt32(Console.ReadLine());

int score = (int)(Math.Truncate(input/10.0) * 10);

string grade = score switch
{
    90 => "A",
    80 => "B",
    70 => "C",
    60 => "D",
    _ => "F"
};


반복문 1 : while
조건을 만족하는 동안 반복

반복문 2 : do while
코드 실행후, 조건을 평가하여 반복 수행

반복문 3 : for
조건을 만족하는 동안 반복(조건 변수 사용)

점프 : 흐름을 특정 위치로 단번에 이동
break, continue, goto, return, throw

break
반복문이나 switch문의 실행을 중단

continue
반복을 건너 뛰어 반복을 계속 수행

goto
지정한 레이블로 제어를 이동

패턴매칭
식이 특정패턴과 일치하는지를 검사

패턴매칭1 : 선언 패턴
주어진 식이 특정형식(int, string) 과 일치하는지를 평가

패턴매칭2 : 형식 패턴
선언 패턴과 거의 비슷하지만 변수를 선언하지 않는다.

패턴매칭3 : 상수 패턴
식이 특정 상수와 일치하는지를 검사

패턴매칭4 : 프로퍼티 패턴
식의 속성이나 필드가 패턴과 일치하는지를 검사

패턴매칭5 관계 패턴
관계 연사자를 이용하여 입력받은 식을 상수와 비교

패턴매칭6 :  논리패턴
복수의 패턴을 논리 연산자(and, or, not)로 조합

패턴매칭7 : 괄호패턴
괄호()로 패턴을 감쌈

패턴매칭8 : 위치 패턴
식의 결과를 분해하고, 분해된 값들이 내장된 복수의 패턴과 일치하는지 검사

패턴매칭9 : var 패턴
null을 포함한 모든 식의 패턴 매칭을 성공시키고, 그 식의 결과를 변수에 할당

패턴매칭10 : 무시 팬턴
var패턴처럼 모든 식과의 패턴 일치 검사를 성공
단, is식에서는 사용할 수 없고, switch식에서만 사용 가능

패턴매칭11 : 목록 패턴
배열이나 리스트가 패턴의 시퀀스가 일치하는지를 검사


using System;
using System.Collections.Generic;
using System.Diagnostics.Tracing;
using System.Linq;
using System.Text;
using System.Threading.Tasks;

namespace _20240226
{
    internal class Program
    {
        static void Main(string[] args)
        {
            //int a = 1;
            //while(a== 2)
            //{
            //    Console.WriteLine("true");
            //}Console.WriteLine("false");

            //1. 구구단 출력하기: 사용자로부터 숫자를 입력받아 해당 숫자의 구구단을 출력하는 프로그램을 작성하세요.
            //for (int i = 1; i <= 9; i++)
            //{
            //    for(int j = 1; j <= 9; j++)
            //    {
            //        Console.WriteLine($"{i} * {j} = {i * j}");
            //    }
            //}


            //2. 숫자 맞히기 게임: 컴퓨터가 1에서 100 사이의 무작위 숫자를 선택하고, 사용자가 그 숫자를 맞히는 게임을 만드세요.사용자가 입력한 숫자가 정답보다 크면 "더 작은 수를 입력하세요"를, 작으면 "더 큰 수를 입력하세요"를 출력하세요. 정답을 맞힐 때까지 반복합니다.
            //Random random = new Random(); //Random 클래스 인스턴스 생성
            //int rand = random.Next(1, 101);// 1부터 100까지 난수 생성
            //Console.Write("숫자를 입력하세요. >> ");
            //int num = int.Parse(Console.ReadLine());
            //Console.WriteLine("컴퓨터가 입력한 숫자는 {0}입니다.", rand);
            //if (rand == num)
            //{
            //    Console.WriteLine("정답");
            //}
            //else Console.WriteLine("오답");


            //3. 짝수와 홀수 합계: 1에서 100까지의 모든 짝수와 홀수의 합을 구하는 프로그램을 작성하세요.
            //int odd = 0;
            //int even = 0;
            //for (int i = 1; i <= 100; i++)
            //{
            //    if(i % 2 != 0)
            //    {
            //        odd += i;
            //    }else if(i % 2 == 0)
            //    {
            //        even += i;
            //    }

            //}
            //Console.WriteLine(odd);
            //Console.WriteLine(even);

            //4. 사용자가 입력한 수의 팩토리얼 계산: 사용자로부터 정수를 입력받고, 그 수의 팩토리얼을 계산하여 출력하는 프로그램을 작성하세요.
            //int a = Convert.ToInt32(Console.ReadLine());
            //int factorialA = 1;
            //for(int i = 1; i <= a; i++)
            //{
            //    factorialA *= i;
            //}
            //Console.WriteLine(factorialA);
            //5. 세 수 중 최댓값 찾기: 사용자로부터 세 개의 숫자를 입력받고, 그 중 가장 큰 숫자를 출력하는 프로그램을 작성하세요.
            //int a = Convert.ToInt32(Console.ReadLine());
            //int b = Convert.ToInt32(Console.ReadLine());
            //int c = Convert.ToInt32(Console.ReadLine());
            //int maxNum = a;
            
            //if( b > maxNum)
            //{
            //    maxNum = b;
            //}
            //if( c > maxNum)
            //{
            //    maxNum = c;
            //}
            //Console.WriteLine("입력된 숫자중 가장 큰 수는 {0} 입니다. ", maxNum);
        }
    }
}

'낙서장 > C#' 카테고리의 다른 글

[C#] 메서드 오버로딩  (0) 2024.06.02
virtual ,override, base  (2) 2024.03.08
상속과 다형성  (1) 2024.03.08
데이터를 가공하는 연산자  (0) 2024.02.25
데이터를 담는 변수와 상수  (0) 2024.02.22

연산자란?

컴파일러에게 데이터 가공을 지시하는 신호

종류 : 산술 / 관계 / 논리 / 비트 /할당 / 기타 ...


증감 연산자 전위, 후위 연산자

int a = 10;
Console.WriteLine(++a);
// a = 11
int b = 10;
Console.WriteLine(b++);
// b = 10
Console.WriteLine(b++);
// b = 11


전위 연산자는 보기와 같이 기존에 정해진 값에서 더한 후 그 값을 출력

후위 연산자는 출력된 후 더하므로

다음 출력때 더해진 값을 출력


using System;
using System.Collections.Generic;
using System.Data;
using System.Linq;
using System.Text;
using System.Threading.Tasks;

namespace _20240223
{
    internal class Program
    {
        static void Main(string[] args)
        {
            //사용자로부터 두 개의 숫자를 입력 받아 덧셈, 뺄셈, 곱셈, 나눗셈 연산을 수행하고 결과를 출력하는 프로그램을 작성하세요.
            //Console.WriteLine(10 + 5);
            //Console.WriteLine(10 - 5);
            //Console.WriteLine(10 * 5);
            //Console.WriteLine(10 / 5);


            //반지름을 입력 받아 원의 넓이를 계산하여 출력하는 프로그램을 작성하세요. (힌트: 원의 넓이 공식 - π * r * r)
            //int r = 5;
            //float circle = r * r * 3.14f;
            //Console.WriteLine(circle);

            //비교 연산자:
            //사용자로부터 두 개의 숫자를 입력 받아 두 숫자가 같은지 여부를 판단하여 결과를 출력하는 프로그램을 작성하세요.
            //Console.WriteLine(10 == 5);

            //사용자로부터 세 개의 숫자를 입력 받아 가장 큰 숫자를 출력하는 프로그램을 작성하세요.
            //int num1 = Convert.ToInt32(Console.ReadLine());
            //int num2 = Convert.ToInt32(Console.ReadLine());
            //int num3 = Convert.ToInt32(Console.ReadLine());
            //int maxNum = Math.Max(num1, Math.Max(num2, num3));
            //Console.WriteLine(maxNum);


            //논리 연산자:
            //사용자로부터 입력받은 숫자가 짝수인지 여부를 판단하여 결과를 출력하는 프로그램을 작성하세요.
            //int num = int.Parse(Console.ReadLine());
            //bool isEven = num % 2 == 0;
            //Console.WriteLine(isEven);


            //사용자로부터 입력받은 숫자가 3의 배수인지 그리고 5의 배수인지를 동시에 판단하여 결과를 출력하는 프로그램을 작성하세요.
            //int num = int.Parse(Console.ReadLine());
            //if(num % 15 == 0)
            //{
            //    Console.WriteLine("3과 5배 공배수");
            //}
            //else if(num % 3 == 0)
            //{
            //    Console.WriteLine("3의 배수입니다.");
            //}else if(num % 5 == 0){
            //    Console.WriteLine("5의 배수");
            //}
            //else {
            //    Console.WriteLine("다른 수");
            //}

            //대입 연산자:
            //사용자로부터 숫자를 입력 받아 그 숫자를 10배로 증가시킨 후 결과를 출력하는 프로그램을 작성하세요.
            //int number = Convert.ToInt32(Console.ReadLine());
            //int result = number * 10;
            //Console.WriteLine("Result: " + result);
            //두 변수의 값을 교환하는 프로그램을 작성하세요. (예: 변수 a에 5, 변수 b에 10이 있다면 a에는 10, b에는 5가 저장되어야 함)
            //int a = 10;
            //int b = 20;
            //int temp = a;
            //a = b;
            //b = temp;
            //Console.Write("a는 {0} b는 {1}", a, b);

        }

    }
}

'낙서장 > C#' 카테고리의 다른 글

[C#] 메서드 오버로딩  (0) 2024.06.02
virtual ,override, base  (2) 2024.03.08
상속과 다형성  (1) 2024.03.08
흐름 제어  (1) 2024.02.26
데이터를 담는 변수와 상수  (0) 2024.02.22

+ Recent posts