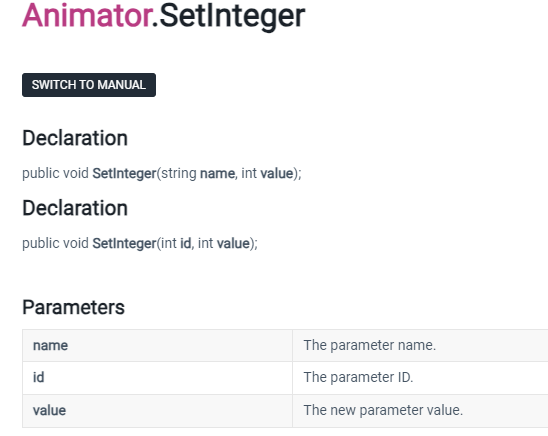
대리자는 - 메서드에 대한 참조를 나타내는 형식 -> class
모든 메서드가 있는 인스턴스를 호환되는 시그니처 및 반환 형식에 연결 가능
대리자는 메서드를 다른 메서드에 인수(매개변수에 메서드를 인스턴스로 할당)
전달하는데 사용된다
시그니처 -> private 접근제한자 메서드이름 값
메서드 전달하는 것 X

인스턴스를  전달 O
대리자 선언 => 형식 정의

delegate는 클래스이므로 인스턴스를 만들 수 있다.


https://learn.microsoft.com/ko-kr/dotnet/csharp/programming-guide/delegates/using-delegates


public delegate int PerformCalculation(int x, int y);
                                         클래스
반환타입 대리자명 매개변수로 구성된다.
int PerformCalculation(int x, int y); 까지 타입이자시그니처이다.

메서드와 비슷하게 생겼다.


대리자(메서드 참조를 나타내는 형식)

https://learn.microsoft.com/ko-kr/dotnet/csharp/programming-guide/delegates/

대리자는 C 및 C++의 함수 포인터처럼 메서드를 안전하게 캡슐화하는 형식

1.  메서드 정의
private int Sum(int a, int b){
return a+b;
}
ㅡㅡㅡㅡㅡㅡㅡㅡㅡㅡㅡㅡㅡㅡㅡㅡㅡㅡㅡㅡㅡㅡㅡㅡㅡㅡㅡㅡ
2. 메서드를 연결할대리자 형식정의
public delegate int PerformCalculation(int x, int y);
시그니처
반환 타입 int 형
매개변수 2개 (int형, int형)
ㅡㅡㅡㅡㅡㅡㅡㅡㅡㅡㅡㅡㅡㅡㅡㅡㅡㅡㅡㅡㅡㅡ
3. 대리자 인스턴스 생성
+
4. 대리자에 메서드 연결 

// Instantiate the delegate.
Callback handler = DelegateMethod;

// Call the delegate.
handler("Hello World");


람다함수


람다식을 사용하면 함수를 직접 만들지 않고

코드 블록을 넘겨줄 수 있으며,

코드의 길이를 줄이고 가독성을 높일 수 있다
ex)  매개변수의 형태 => 리턴형식;


대리자 - C# 프로그래밍 가이드

C#의 대리자는 매개 변수 목록 및 반환 형식이 있는 메서드를 나타내는 형식입니다. 대리자는 메서드를 다른 메서드에 인수로 전달하는 데 사용됩니다.

learn.microsoft.com


대리자 사용 - C# 프로그래밍 가이드 - C#

대리자를 사용하는 방법을 알아봅니다. 대리자는 메서드를 안전하게 캡슐화하는 개체 지향적이고 형식이 안전하며 보안이 유지되는 형식입니다.

learn.microsoft.com


대리자 사용 - C# 프로그래밍 가이드 - C#

대리자를 사용하는 방법을 알아봅니다. 대리자는 메서드를 안전하게 캡슐화하는 개체 지향적이고 형식이 안전하며 보안이 유지되는 형식입니다.

learn.microsoft.com


'산대특 > 게임 알고리즘' 카테고리의 다른 글

ClimbCloud-2  (1) 2024.02.01
ClimbCloud  (2) 2024.02.01
Git, SourceTree  (1) 2024.01.31
CatEscape 게임  (2) 2024.01.30
멤버 변수와 지역 변수  (0) 2024.01.29

깃이란?

깃다운로드 검색

윈도우면 윈도우 클릭

https://git-scm.com/downloads


Git - Downloads

Downloads macOS Windows Linux/Unix Older releases are available and the Git source repository is on GitHub. GUI Clients Git comes with built-in GUI tools (git-gui, gitk), but there are several third-party tools for users looking for a platform-specific exp

git-scm.com


버전에 맞춰 설치하면 되지만 일반적으로 이럴 것이다.


그 후 다른 옵션은 건들지 않고 Next만 누르면 설치가 된다


깃이 설치가 완료되면 깃허브를 들어가서 회원가입 or 로그인


https://github.com/


GitHub: Let’s build from here

GitHub is where over 100 million developers shape the future of software, together. Contribute to the open source community, manage your Git repositories, review code like a pro, track bugs and fea...

github.com


그후 레포지토리를 관리해주는 SourceTree를 설치할 것이다.


소스 트리 다운 로드

https://www.sourcetreeapp.com/


Sourcetree | Free Git GUI for Mac and Windows

A Git GUI that offers a visual representation of your repositories. Sourcetree is a free Git client for Windows and Mac.

www.sourcetreeapp.com


여기는 건너뛰

가끔 이렇게 깃이 설치된 경로를 못찾거나 하는 경우에 생기는 것 같은데

저기에 체크박스가 있으면 체크박스 선택 후 

고급옵션 => 기본적으로 줄 끝을 자동으로 처리하도록설정을 체크


이렇게 하면 기본적으로 Git, SourceTree 설치가 완료된다.


SourceTree를 사용하면 cmd창에서

git add. / git commit -m ""  같은 문구를 보기 편한 UI 버튼으로 만들어주기에

보기에 편하여 사용하는 Tool 이다. 


추 후

깃에 올릴때는
본인이 만든 Assets, Packages, ProjectSettings만 복사 한다 나머지 ignore + .vsconfig
깃 레포지 링크를 복사해서 sourcetree에 넣고

새폴더를 만들어 저장위치를 지정하고 클론
생성된 로컬 레포지에 들어가서 새폴더 생성
sourcetree에서 스테이지에 올리면 -> git add. 상태
그리고 메세지를 입력하여 커밋하면 로컬 레퍼지토리로 넘어간다. -> git commit -m " "
그 다음 단계는 푸시 => git push

'산대특 > 게임 알고리즘' 카테고리의 다른 글

ClimbCloud  (2) 2024.02.01
C# 대리자, 람다함수  (1) 2024.01.31
CatEscape 게임  (2) 2024.01.30
멤버 변수와 지역 변수  (0) 2024.01.29
유니티 실행 시 인터페이스  (0) 2024.01.25

우선 textures에 새로운 사진들을 첨부한후

Texture Type을 Sprite(2D and UI)로 변경후 Apply 


배경을 덮은 후 

캐릭터를 가져오는데 뒤에 가려져서 보이지 않으면

다음과 같이 Order in Layer을 1로 변경하면 앞에 배치된다.


캐릭터에 적용 할 c# script의 제목으로 PlayerController로 저장후

이동과 이동시 콘솔에 찍히도록 코드를 작성

using System.Collections;
using System.Collections.Generic;
using UnityEngine;

public class PlayerController : MonoBehaviour
{
    // Start is called before the first frame update
    void Start()
    {
        
    }

    // Update is called once per frame
    void Update()
    {
        if (Input.GetKeyDown(KeyCode.LeftArrow))
        {
            Debug.Log("왼쪽으로 2유닛만큼 이동");
            this.transform.Translate(-2, 0, 0);
        }
        if (Input.GetKeyDown(KeyCode.RightArrow))
        {
            Debug.Log("오른쪽으로 2유닛만큼 이동");
            this.transform.Translate(2, 0, 0);
        }
    }
}


그 후 화살표가 땅에 닿으면 사라지게 작성

아래 콘솔을 보면 arrow의 좌표가 찍히다가 사라지는 것을 알 수 있다.

using System.Collections;
using System.Collections.Generic;
using UnityEditor;
using UnityEngine;
using UnityEngine.Windows.Speech;

public class ArrowController : MonoBehaviour
{
    [SerializeField] private float speed = 1f;
    void Start()
    {

    }

    void Update()
    {
        // 화살표가 내려오면서 Console에 찍히도록 
        Vector3 movement = Vector3.down * speed * Time.deltaTime; // 방향 * 속도 * 시간
        this.transform.Translate(movement);
        Debug.LogFormat("y: {0}", this.transform.position.y);
        
        if(this.transform.position.y <= -3.56)
        {
            Destroy(this.gameObject);
        }
    }
}


그리고 이제 충돌하면 사라지게 만들 것인데

그러기 위해 두 텍스쳐간의 radius (캐릭터를 중심으로한 테두리 원이라 생각하면 편하다.)을 보이는 선을 지정해주고

두 텍스쳐간의 거리가 두텍스쳐간의 radius의 합보다 가까워 지면 arrow가 사라지게 할 것이다.

https://docs.unity3d.com/ScriptReference/Gizmos.DrawWireSphere.html

using System.Collections;
using System.Collections.Generic;
using UnityEngine;

public class PlayerController : MonoBehaviour
{
    public float radius = 1f; // radius를 개발자가 인스펙터에서 바꿀수 있도록 선언
    void Start()
    {
        
    }

    // Update is called once per frame
    void Update()
    {
        if (Input.GetKeyDown(KeyCode.LeftArrow))
        {
            Debug.Log("왼쪽으로 2유닛만큼 이동");
            this.transform.Translate(-2, 0, 0);
        }
        if (Input.GetKeyDown(KeyCode.RightArrow))
        {
            Debug.Log("오른쪽으로 2유닛만큼 이동");
            this.transform.Translate(2, 0, 0);
        }
    }
    private void OnDrawGizmos()
    {
        Gizmos.color = Color.red;
        Gizmos.DrawWireSphere(this.transform.position, this.radius);
    }

}


using System.Collections;
using System.Collections.Generic;
using UnityEditor;
using UnityEngine;
using UnityEngine.Windows.Speech;

public class ArrowController : MonoBehaviour
{
    [SerializeField] private float speed = 1f;
    [SerializeField] private float radius = 1f;

    private GameObject playerGo;
    void Start()
    {
        this.playerGo = GameObject.Find("player");
    }

    void Update()
    {
        // 화살표가 내려오면서 Console에 찍히도록 
        Vector3 movement = Vector3.down * speed * Time.deltaTime; // 방향 * 속도 * 시간
        this.transform.Translate(movement);
        Debug.LogFormat("y: {0}", this.transform.position.y);
        
        if(this.transform.position.y <= -3.56)
        {
            Destroy(this.gameObject);
        }
        // 두 텍스쳐(arrow, player) 간의 거리
        Vector2 p1 = this.transform.position;
        Vector2 p2 = this.playerGo.transform.position;
        Vector2 dir = p1 - p2; // 방향
        float distance = dir.magnitude; // 거리 
        // float distance = Vector2.Distane(p1,p2); // => 거리만 알고 싶을 때

        // 두 radius 간의 거리
        float r1 = this.radius;
        PlayerController controller = this.playerGo.GetComponent<PlayerController>();
        float r2 = controller.radius;// 여기서 보호 수준 때문에 PlayController.cs 의 radius를 퍼블릭으로 변경
        float sumRadius = r1 + r2;

        // 두 텍스쳐간의 거리가 두텍스쳐간의 radius의 합보다 가까워 지면 arrow가 충돌이라 인지하고 arrow를 사라지게 할 것이다.
        if(distance < sumRadius)
        {
            Debug.LogFormat("충돌함: {0}, {1}", distance, sumRadius);
            Destroy(this.gameObject) ;
        }
    }
    private void OnDrawGizmos()
    {
        Gizmos.color = Color.red;
        Gizmos.DrawWireSphere(this.transform.position, this.radius);
    }

}


프리팹

프리팹 : 게임 오브젝트를 파일화 시킨것 (에셋)

https://docs.unity3d.com/kr/2018.4/Manual/Prefabs.html


프리팹 - Unity 매뉴얼

Unity의 프리팹 시스템을 이용하면 게임 오브젝트를 생성, 설정 및 저장할 수 있으며, 해당 게임 오브젝트의 모든 컴포넌트, 프로퍼티 값, 자식 게임 오브젝트를 재사용 가능한 에셋으로 만들 수

docs.unity3d.com


아래와 같이 하이어라이키에 있는 arrow를 새폴더(Prefabs)를 만들어 넣어주었고,

그러면 하이어라이키에 있는 arrow는 삭제해도 된다.


그 후 c# script를 만들어서 아래와 같은 선언


그러고 나서 생성된 gameObject의 arrowPrefab에 Prefabs에 있는 arrow를 할당


클론한 arrow가 떨어지게 한다.

using System.Collections;
using System.Collections.Generic;
using UnityEngine;

public class ArrowGenerator : MonoBehaviour
{
    //프리팹 에셋을 가지고 프리팹 인스턴스를 만든다 
    [SerializeField] private GameObject arrowPrefab;

    void Start()
    {
        GameObject go = Instantiate(this.arrowPrefab);  //프리팹 인스턴스 
        //위치는 프리팹 에셋에 설정된 위치 
        //위치를 재설정 
        Debug.LogFormat("go: {0}", go);
    }

    void Update()
    {

    }
}


델타를 선언한후 3이될때마다 새로운 arrow 출력

using System.Collections;
using System.Collections.Generic;
using UnityEngine;

public class ArrowGenerator : MonoBehaviour
{
    //프리팹 에셋을 가지고 프리팹 인스턴스를 만든다 
    [SerializeField] private GameObject arrowPrefab;
    private float delta;
    void Start()
    {
       
    }

    void Update()
    {
        delta += Time.deltaTime;
        Debug.Log(delta);
        if (delta >= 3)
        {
            GameObject go = Instantiate(this.arrowPrefab);  //프리팹 인스턴스 
                                                            //위치는 프리팹 에셋에 설정된 위치 
                                                            //위치를 재설정 
            delta = 0;
        }
    }
}


이제 기즈모의 테두리를 볼 필요 없으니 기즈모 부분만 주석처리하고

화살표 떨어지는것의 방향 Vector3는 구조체 이므로 x좌표만 랜덤으로 지정하였다.

(y, z는 기존에 ArrowController에서 0으로 지정하였기에 좌표만 찍어주면 된다.)

using System.Collections;
using System.Collections.Generic;
using UnityEngine;

public class ArrowGenerator : MonoBehaviour
{
    //프리팹 에셋을 가지고 프리팹 인스턴스를 만든다 
    [SerializeField] private GameObject arrowPrefab;
    private float delta;
    void Start()
    {
       
    }

    void Update()
    {
        delta += Time.deltaTime;  //이전 프레임과 현재 프레임 사이 시간 
        //Debug.Log(delta);
        if (delta > 3)  //3초보다 크다면 
        {
            GameObject go = Object.Instantiate(this.arrowPrefab); // 생성
            float randX = Random.Range(-9.7f, 9.7f); // 화살표가 화면 상에 떨어질 범위
            go.transform.position = new Vector3(randX, go.transform.position.y, go.transform.position.z); // x축 위치만 랜덤하게
            delta = 0;  //경과 시간을 초기화 
        }
    }
}


이제 체력바를 만들어줄건데

하이어라이키에 우클릭후 ui-canvas 로 만들어주고

저렇게 두군데를 canvas scaler에 있는 scale with screen size, expand를 해줘야

각각의 다른 매체에서 열 때 화면 사이즈 최적화가 된다.


이렇게 캔버스 안에 이미지를 넣어주고 적절하게 크기 조절 후 배치

※캔버스가 너무 커서 이미지가 scene에 잘 안보일수 있으므로

하이라이키에 있는 이미지를 더블클릭해서 위치 찾기


그후 보기와 같이 이미지 타입과

fill origin은 기호에 맞게 설정한후

fill amount 수치를 바꾸면 원안에 파란색 게이지가 변함을 확인할 수 있다.

새로운 하이어라이키와 script 생성 후 오브젝트로 넣는다.


using System.Collections;
using System.Collections.Generic;
using UnityEngine;
using UnityEngine.UI; // UI를 사용할 것이므로 추가

public class CatEscapeGameDirector : MonoBehaviour
{
    [SerializeField] private Image hpGauge;

    public void DecreaseHp() //체력을 감소시키는 메서드 생성
    {
        this.hpGauge.fillAmount -= 0.1f; //충돌할때마다 체력을 감소하기 위한 선언
    }
}


맴버변수에 선언

이름으로 게임오브젝트를 찾는 것에 FindObjectOfType<CatEscapeGameDirector>(); 추가

마지막에 충돌했을 때 체력이 감소하는 메서드 선언

using System.Collections;
using System.Collections.Generic;
using UnityEditor;
using UnityEngine;
using UnityEngine.Windows.Speech;

public class ArrowController : MonoBehaviour
{
    [SerializeField] private float speed = 1f;
    [SerializeField] private float radius = 1f;

    private GameObject playerGo;

    //동적으로 생성되는 메서드는 씬에 있는것 을 Assign 할수 없다 
    private CatEscapeGameDirector gameDirector;
    void Start()
    {
        //이름으로 게임오브젝트를 찾는다 
        this.playerGo = GameObject.Find("player");
        this.gameDirector = GameObject.FindObjectOfType<CatEscapeGameDirector>();
    }

    void Update()
    {
        // 화살표가 내려오면서 Console에 찍히도록 
        Vector3 movement = Vector3.down * speed * Time.deltaTime; // 방향 * 속도 * 시간
        this.transform.Translate(movement);
        //Debug.LogFormat("y: {0}", this.transform.position.y);
        
        if(this.transform.position.y <= -3.56)
        {
            Destroy(this.gameObject);
        }
        // 두 텍스쳐(arrow, player) 간의 거리
        Vector2 p1 = this.transform.position;
        Vector2 p2 = this.playerGo.transform.position;
        Vector2 dir = p1 - p2; // 방향
        float distance = dir.magnitude; // 거리 
        // float distance = Vector2.Distane(p1,p2); // => 거리만 알고 싶을 때

        // 두 radius 간의 거리
        float r1 = this.radius;
        PlayerController controller = this.playerGo.GetComponent<PlayerController>();
        float r2 = controller.radius;// 여기서 보호 수준 때문에 PlayController.cs 의 radius를 퍼블릭으로 변경
        float sumRadius = r1 + r2;

        // 두 텍스쳐간의 거리가 두텍스쳐간의 radius의 합보다 가까워 지면 arrow가 충돌이라 인지하고 arrow를 사라지게 할 것이다.
        if(distance < sumRadius)
        {
            Debug.LogFormat("충돌함: {0}, {1}", distance, sumRadius);
            Destroy(this.gameObject) ;
            this.gameDirector.DecreaseHp();
        }
    }
    private void OnDrawGizmos()
    {
        //Gizmos.color = Color.red;
        //Gizmos.DrawWireSphere(this.transform.position, this.radius);
    }

}


그리고 마지막으로 만들어 hpGauge 오브젝트에 하이러라이키에 있는 hp 이미지를 넣으면 완성된다.


'산대특 > 게임 알고리즘' 카테고리의 다른 글

C# 대리자, 람다함수  (1) 2024.01.31
Git, SourceTree  (1) 2024.01.31
멤버 변수와 지역 변수  (0) 2024.01.29
유니티 실행 시 인터페이스  (0) 2024.01.25
게임 아이템 정보 출력  (0) 2024.01.24

+ Recent posts